Altiris KB# 50744 – Agent Install Page Slow
August 11, 2010
AKB# 50744 covers a problem where the Altiris Agent install page loads very slowly. This symptom occurs regardless of how you access the page (Actions> Agents/Plug-ins> Push Altiris Agent) or (Settings> Agents/Plug-ins> Altiris Agent). In my environment I started seeing upwards of seven often 10 minute load times for the push screen, unacceptable by any standard. The KB talks about a stored procedure that is used to help populate the data in the grid on the install page. The article goes on to explain that in testing this SPROC was taking approximately 5 minutes to run, similar to the times I was seeing.
The article then discusses the evt_aex_agent_push_status table, this is where information about computers you add to the grid to install the agent to is stored. I found on my installation of SMP 7 SP4 that this table was named evt_aex_push_status with the word ‘agent’ removed. There are 2 solutions to this issue, the one prescribed in the KB article is the faster of the two.
1.) Truncate the evt_aex_agent_push_status or evt_aex_push_status table. This clears the data from the table and the SPROC should complete in seconds rather than minutes which translates directly into a much faster load time in the console. It is important to note the use of truncate here and not delete. ‘Deletes’ in SQL Server are logged and so running a delete against a table with a lot of records isn’t advisable (unless you have all day). Secondly, and perhaps more importantly, a truncate can be rolled back.
2.) If you wait the painful 5-10 minutes for the Agent push screen to load, clear all computers out of both the Windows and (more importantly) the ULM (unix linux mac) push tab. It seems as though ULM computers cause this more than windows devices.
The reason for this post is to add the following code that you can use to create a stored procedure (SPROC) of your own to truncate the aex push data table. Paste the following code into SSMS or your tool of choice.
USE Symantec_CMDB
set ANSI_NULLS ON
set QUOTED_IDENTIFIER ON
GO
CREATE PROCEDURE [dbo].[usp_TruncateAeXPushStatus]
AS
SET NOCOUNT ON
TRUNCATE table Evt_AeX_Push_Status
This will create a SPROC called ‘usp_TruncateAeXPushStatus’ that you can then execute to truncate your push status table in the event that this should happen again. The SPROC might be overkill since you are typing ‘exec usp_truncateaexpushstatus’ instead of ‘truncate table evt_aex_push_status’ but hey, I saved you from typing some underscores.
Keep in mind you have to have the proper permissions to truncate tables and this also fixed another issue I was having where it was taking five minutes or more just to add a ULM computer on that screen.
Intel PPM Driver 0x7E BSOD
June 3, 2010
I recently had the displeasure of getting a 0x7E blue screen while trying to deploy our WinXP SP3 HI image to a couple of HP-Compaq NX6125 laptops. We use HIIS from Altrinsic Solutions and I thought perhaps that HIIS was trying to inject a HAL that was incorrect so I went into the driver management screen and ended up trying 3 different HAL files, none of which worked. After contacting Altrinsic support they were happy to share some information related to the 0x7E issue.
0x7E has a few root causes, mine happened to be that my HI image was built in VMWare running on an Intel processor and I was trying to send the image over to an AMD based machine. The technical details are as follows:
- DS 6.9 SP3
- Windows Server 2003 Std. SP2 (x86)
- HIIS 6.9.0.1530
The fix is pretty straightforward as long as you’re comfortable with REGEDIT.
- Open Image Explorer on the DS and within the image navigate to C:\WINDOWS\SYSTEM32\CONFIG.
- Find the file named “SYSTEM”, it has no extension. This is a registry hive.
- Right click the file and choose extract and send it out to the desktop of the DS. Do not close Image Explorer, you will need to replace this file later.
- Launch REGEDIT on the DS and select HKEY_LOCAL_MACHINE and go to File> Load Hive, browse to the desktop and select the SYSTEM file you exported from the image in the previous step.
- A dialog box will prompt you to name the hive, I used “temp”. Once you load the hive, expand the HKEY_LOCAL_MACHINE and then expand your TEMP hive.
- Under the temp hive, find the “Select” folder and click once on it. In the right pane of regedit you should see some keys with their values such as: Current, Default, Failed, and LastKnownGood. What you are looking for is the value of “Current,; mine was 1.
- The value of Current is going to relate to which “CurrentControlSet” folder you need to open. Since my value for Current was 1, I opened the CurrentControlSet001 folder. Expand the CurrentControlSet00Y (where Y is the value for “Current” in the previous step) folder and then expand Services.
- Scroll down through the list of Services until you find “intelppm” and single click it. In the right pane you see several items, one of which should be “Start”. In my case, the value of Start was (1) which means the Intel driver is enabled; this was my problem.
- Double click on the Start value and change it from 1 to 4 (leaving Hexadecimal selected). Once that is complete, collapse the TEMP hive and go to File> Unload Hive and confirm you wish to unload it.
- Close regedit and then drag the SYSTEM file from the desktop of the DS (the one we just made a change to) over into the C:\WINDOWS\SYSTEM32\CONFIG directory within your image using image explorer and confirm your wish to overwrite the current SYSTEM file. Finally, close down Image Explorer and retry your image job.
What this does is disable the Intel PPM driver from loading during startup. My image deployed perfectly after this change was made.
One important thing to note: When you deploy this adjusted image to an Intel based machine, the registry value we changed will be flipped back to 1 or the keys/values will be recreated so that everything functions properly. There is NO need to create deploy jobs both processors.
That wraps up this post and I hope that I’ve given you enough information to fix your issue. Another cause of the 0x7E BSOD is if you are attempting to use a HAL file collected from XP SP2 on an image that is SP3, you sometimes run into issues there. If you haven’t checked out HIIS, give the demo a try.
Helpdesk 6.0 SP5 Satisfaction Survey Mod
February 3, 2010
Having run into a few incidents with external users trying to access our helpdesk satisfaction surveys, I decided to stop having the users append the FQDN to the server name and just fix the “cause.” I quote cause here because the true cause of the issue is not that the server name needs the domain name appended to the end of it; the root cause is an older version of the cisco anyconnect VPN client experiencing a split tunnel routing confusion issue.
Rather than seeking out to fix true root cause of the issue (and opening the can of worms that is herding an external sales group) I decided to fix the low hanging fruit. Users did not always need to click a link to respond to helpdesk surveys, they used to be done right in the email and then submitted. When outlook 2007 came out and switched the HTML rendering engine from IE to word and “set email back 10 years,” we were forced to adjust the email template. See the AKB# 35098 for more details.
The template now contains a link so that everything is rendered properly in a browser window. The fix was fairly simple, edit the satisfaction survey, scroll to the bottom, you should see the following text:
<A HREF="REGEX[[URLALIAS(workitemsatsurveyurl)]][[\{0\}]][[WORKITEM(workitem_number)]]">Click here for Satisfaction Survey</A>
This uses a regular expression and can be adjusted straight to the URL instead. My change was as follows:
<A HREF="http://servername.zombo.com/aexhd/winuser/default.aspx?cmd=satSurvey&id=WORKITEM(workitem_number)">Click here for Satisfaction Survey</A>
This eliminates the split tunnel confusion issue and forces the VPN client to send the http request down the corporate tunnel because it sees the FQDN. Our external users are now free from needing to append anything to their survey URLs.
SQL Server 2005 Version/Service Pack Query
January 28, 2010
Throwing this post out here more for myself than anything. The following query will determine what Service Pack your SQL 2005 server is running.
SELECT SERVERPROPERTY(‘productversion’), SERVERPROPERTY (‘productlevel’), SERVERPROPERTY (‘edition’)
Published Workflow Issue
November 24, 2009
I was experiencing an issue where after publishing a workflow to the workflow server the page that would come up where your supposed to see your webform or project was showing a “Page cannot be displayed” error. A quick MySupport incident and a phone call from SYMC support found the issue that .NET 3.5 SP1 was installed.
The solution is to uninstall 3.5 SP1, 2.0, and 1.1. I then rebooted and reinstalled in reverse order up to 3.5 WITHOUT 3.5 SP1. After double checking the associations in ‘default website’ in IIS Manager and an iisreset I was good to go.
First Workflow…Check
November 23, 2009
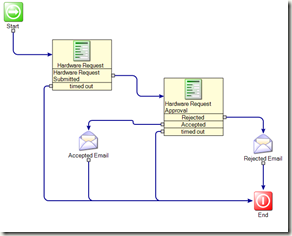
Just finished off my first workflow with the help of a user submitted video on Symantec Connect. Pretty simple workflow really, it’s a basic hardware request. I really like the interface, I just have a lot more learning to do. Anyone else using Workflow?
Workflow 7.0
November 21, 2009
It’s that time of year, just in time for the holidays and our fiscal year has ended and the new one has begun. New fiscal years mean new budgets and hopefully some new solutions or consulting help for existing solutions for us lucky ones. This year we have been fortunate enough to have budgetary approval for workflow solution.
We’ve obtained the licenses and today I setup the solution in the SMP and installed the server/designer on our freshly built workflow server. That’s about as far as I’ve gotten for now but I’m curious – What is the first process you setup or had built with your brand spankin new solution?
tl;dr – What is the first thing you did with workflow 6/7?
Search Federation
November 5, 2009
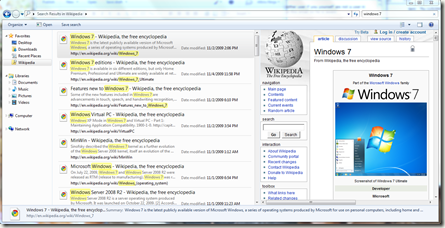
One of the new lesser publicized features in Windows 7 is called Search Federation. If a website uses the OpenSearch standards you can create an XML file and save it as a .OSDX file so that Windows will recognize it.
Search federation for example allows you to search Wikipedia from within Windows Explorer. There are several connectors already available, you can find them at the bottom of this article. One thing to note is even if a site doesn’t use open search, you can search it using live search.
You can see it in action with the preview pane open here:
Free Hyper-V book
November 5, 2009
You can pickup a free copy of Windows Server 2008 Hyper-V by going here. Thanks to NetApp for putting on this promotion, you must register by November 20th, 2009.
The New Efficiency
November 5, 2009
Yesterday I attended a New Efficiency event in Kansas City put on by Microsoft to help get the word out about Windows 7, Windows Server 2008 R2, and Exchange Server 2010. The event was packed, I’m guessing somewhere around 400 people or more.
Overall, it was a pretty solid event. It sure helps that they gave out a free copy of Windows 7 ultimate. It was nice to get to listen to MS Technical Evangelist Kevin Remde speak, he had some great presentations.
You can checkout Kevin’s blog here.

